A View Inside My Head

Jason's Random Thoughts of Interest

NAVIGATION - SEARCH

Self Promotion: My Games

As a web developer by trade, I find the ability to create an application using HTML5, CSS3, and JavaScript to be very compelling. In my opinion, Microsoft did a fantastic job of offering this as one of the language choices for developing Windows Store apps – you get native packaging of your web assets into an application that can be sold in an app store without needing to use a webserver, or a hybrid app container like PhoneGap, etc. 

I took advantage of this to write a handful of games that have been published.
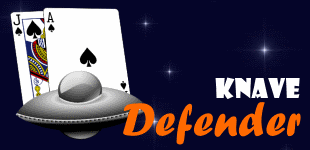
Logo Image: Knave Defender   Logo Image: Knave Blackjack

Logo Image: Knave Craps   Logo Image: Knave Slots

Logo Image: WuX   Logo Image: WuX Defender

Knave Defender

The very first game that I wrote for the Windows Store was Knave Defender:

This game started out with the concept of being part of a larger Blackjack trainer – a series of mini-games intended to build skills needed for playing Blackjack. This particular mini-game was intended to strengthen the ability to quickly sum up a hand. The goal is to build a hand of 21 before an invading UFO lands (to destroy the ship). If you bust, then the invader escapes. If the invader lands, you lose a life.

Being my first game, I didn’t know when to stop adding things to it.  The original Knave Defender had a full soundtrack and sound effects (that I purchased rights to for about $50 total). It had multiple levels. It had a menu, and a pause mode, and configuration options.  And, after a year and a half of being in the store, it has only 189 downloads.

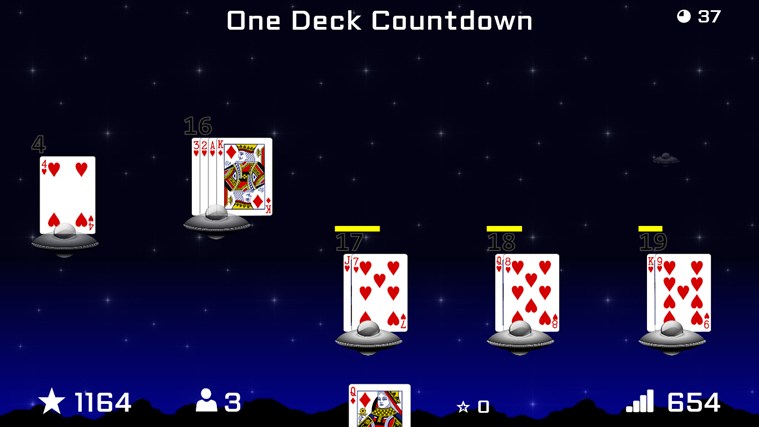
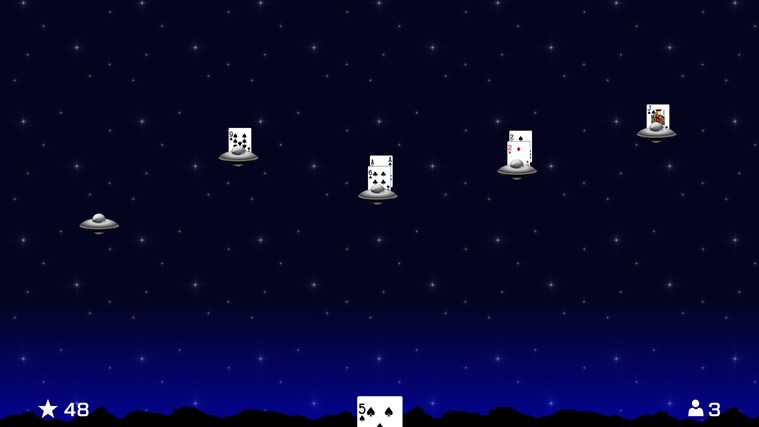
Just this week, I rewrote Knave Defender as a Universal App with the intention of releasing it for the Windows Phone, too. I stripped out a lot of the extra cruft, and turned it into a simple repeating invader game. Keeping with the original vision of being a Blackjack trainer, I disabled the display of the hand’s sum so that the player has to do that part in their head.  I also added a global leaderboard so that your high scores can be compared to other players from around the world.

Screen shot 1


Knave Blackjack

The first step to submitting an app to the Windows Store is to reserve a name for the app. As you can imagine, “Blackjack” was quickly snapped up by somebody out there, so I had to come up with another interesting name.  So, even before Knave Defender was released, I had the name “Knave Blackjack” reserved for this game.

Knave comes from a card that existed in the deck of playing cards before the Jack card was added. It was of the same rank as a Jack card today. One reason for its replacement was because the Knave’s index was “Kn” and was often mistaken for a King (“K”) in a fanned out hand held by a player.  So, in some ways, “Knave” is a synonym for “Jack”, and that’s why I use it today for all of my casino-related games.

The idea to write a blackjack game came from a presentation that I gave at Devlink with Mike Eaton. We were doing a parity talk to show how a Windows Store app would be developed in HTML/JavaScript (my preference) versus XAML (Mike’s).  Not wanting to do another To-Do list as the demo, we decided on using Blackjack as the theme instead. My part of that demo eventually morphed into Knave Blackjack:

Screen shot 1

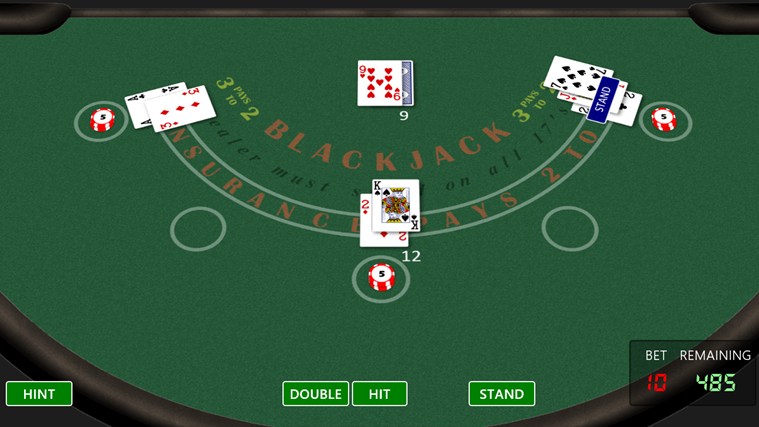
I fell in love with CSS transforms while writing this game, and made the view of the table something that the user could control (panning, tilting, and zooming are all accomplished using touch gestures that change a style on a DIV).  I also designed the table to be skinnable for a marketing idea that I have yet to bring to fruition.
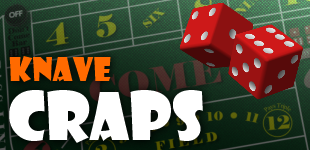
 

Knave Craps

For me, the best game in a casino is Craps, so I just had to follow up Blackjack with a realistic Craps game. A casino opened up along my daily drive home, so I had a place to play (I like to call that “research”) in order to observe how the dealers handle bets and payouts. After a few months of work, Knave Craps was released:

Screen shot 1

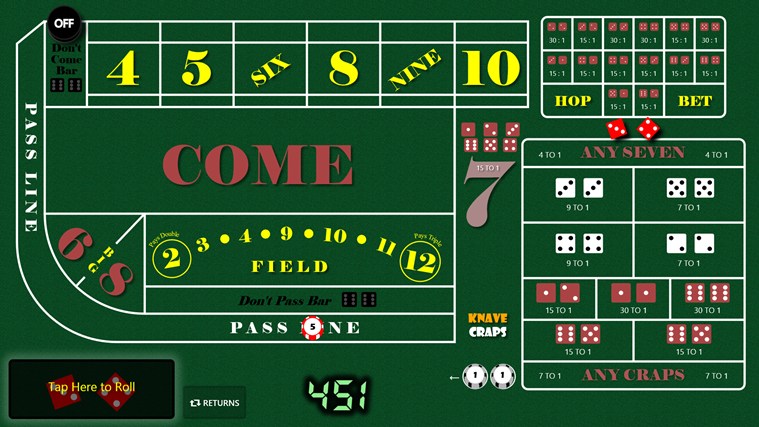
Writing Blackjack had taught me that people inherently do not trust Random Number generators, no matter how careful you are at trying to ensure random results. People even go so far as to accuse the game of intentionally doing something in order to screw over their bets.  (Their electronic bet, mind you, that cost them no real money to place). The reviews that I get for the Craps game show that the same issues exist.

To mitigate this, I added a feature to track statistics over time to see what the roll distribution is. I also added a feature to have thousands of rolls performed to ensure that the results fit the expected curve. And, to put the player in charge, I wrote the randomizer to shuffle through possible rolls over a 3-second period, allowing the player to stop the randomization at any time. 
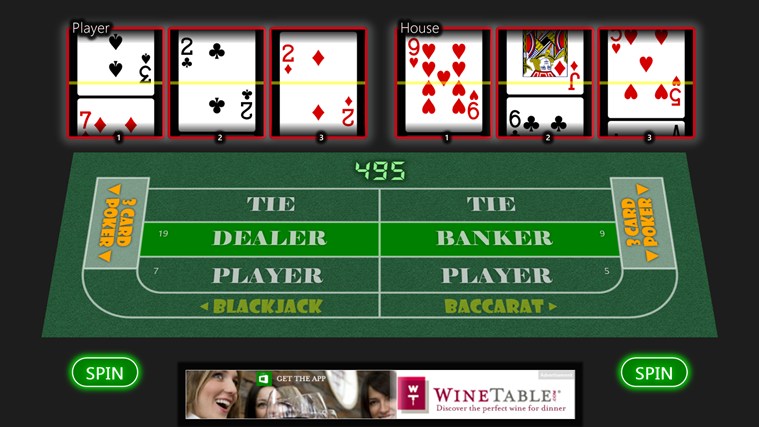
 

Knave Slots

After Craps, I wanted to do one more casino-style game, but I also wanted it to be unique.  I came up with the concept of combining several games into one: Slots (for randomization), Blackjack, Baccarat, and 3-Card Poker.  The thought was that the slot machine aspect would generate three random cards for the player, and three for the house. The player would place a bet on the winner of any hand (either player, dealer, or tie), and spin the reels.  This game became Knave Slots:

Screen shot 1


WuX

At some point while writing the casino games, I started thinking about game theory and how randomization is handled by things like Rock-Paper-Scissors. This introduced me to the RoShamBo, a generalized game that Rock-Paper-Scissors is based on. A RoShamBo has an odd number of elements available, with each element beating half of the other elements (and beaten by half of the other elements). So, in Rock-Paper-Scissors, there are three elements, with each choice winning and losing to one other choice (not considering ties).

Being a fan of the World of Warcraft, I wanted to write a game that used the Elements to form a RoShamBo. Looking for some historical context, I stumbled upon the ancient Chinese Wu Xing (translates as five rows, but it is often taken to mean five elements in Western cultures). This gave me an odd number of elements to work with and rules about which element strengthens or weakens another element.

So, Wood, Fire, Earth, Metal, and Water made their debut in a puzzle/strategy came that I called WuX:

Screen shot 2

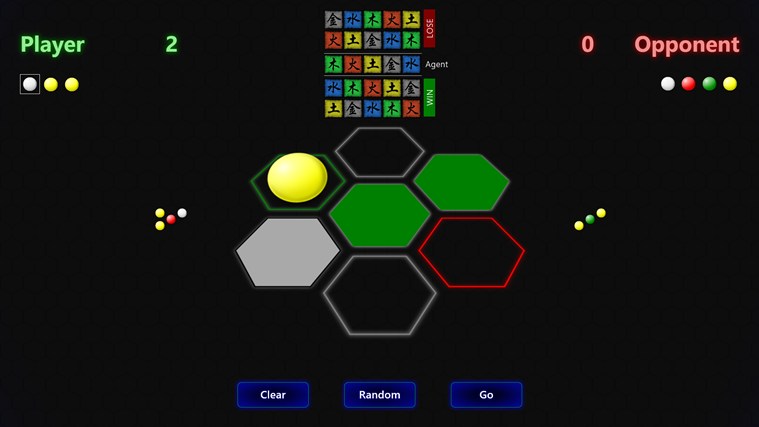
In WuX, players take turn placing a random element in a cell. They are blind to what the opponent has placed until both players have claimed the same cell, and then a decision is made using the Wu Xing RoShamBo. The goal is to get three-across (using the center cell), and if that is not possible, then to win more cells than your opponent.

It’s a puzzle in that you are trying to figure out what your opponent has placed where, and a strategy game because you need to keep enough of your elements around to beat their remaining element, especially for the all-important center cell.

WuX maintains a global leaderboard that tracks a cumulative score, as well as the number of wins, losses, and tie games over a player’s career.


WuX Defender

After the rewrite of Knave Defender to make it focused on being a Blackjack trainer, I decided to make a variant of the game using concepts from WuX. Each invader starts with a random element. Instead of cards, the player gets a random element to assign to an invader. The goal is to “weaken” the invader to destroy it, but it’s not always possible, so you have to try to decide how to dispose of elements in order to move on.  Sometimes, this results in strengthening an invader (i.e., adding wood to fire will strengthen the fire).

This game became Wux Defender:

Screen shot 1


What’s Coming

WuX started out as a mini-game in a larger game that I’m currently working on called Amassment. I decided that the WuX aspect made Amassment too complicated, so that’s why it was pulled out into its own standalone game. I’m hoping to have Amassment in the store before Summer 2014.

HTML/JavaScript Universal Apps: A First Look

For me, one of the most exciting and long-anticipated announcements from last week’s //BUILD conference is the upcoming ability to write Windows Phone 8.1 apps using HTML and JavaScript.

As a web developer, I spend a tremendous amount of time every day writing client-side code that runs in a web browser. I have made a huge investment in mastering these skills and keeping up with emerging trends and “best practices”. The declarative layout and rendering languages of the web, HTML and CSS, are widely known standards that for the most part work identically between platforms (albeit, with a few platform-specific idiosyncrasies). So, it makes perfect sense to me that HTML5 is the best solution for writing cross-platform apps.

Windows Phone 8.1, due for release later this month with widespread over-the-air updates happening this summer, will finally have parity with its tablet/desktop siblings in the ability to run WinRT apps.  This app model allows developers to use the language of their choice to develop apps, from C++ to .NET to HTML/JavaScript.

Since Windows 8.1 and Windows Phone 8.1 will share the same app model (as will the Xbox One, it was announced), the natural question is: Can I write my apps once and have them just work on each platform?  The answer, for the most part, is ‘Yes’, using a new solution type called Universal Apps.

Starting with Visual Studio 2013.2, you will find new project types for creating Universal Apps:

image

Creating a new Universal App project will make a solution with three projects inside: a Windows app project, a Windows Phone app project, and a Shared Code project:

image

Most of your application’s code will go into the Shared project. But, here’s where reality sets in: because a phone is different than a tablet/desktop, both in screen size, memory, and general platform capabilities, it is necessary to maintain some platform-specific pieces within their own project types.  So, any artifact that exists in a platform-specific project will override the same file from the shared project at build time.

For HTML/JavaScript apps, this primarily means maintaining different stylesheets between projects. But, in my tests, there are a few other things that didn’t “just work” while converting an existing Windows 8.1 app into a Universal App. These differences may require some code refactoring in order to separate the features that are only available on a particular platform from the rest of your shared code.

Incompatibilities that I’ve found:

  • No SettingsFlyout: In Windows 8.1 Apps, settings are maintained within flyouts that are accessed from the Settings Charm. This does not seem to be implemented on the phone, so you will need to find an alternative way for the user to specify settings, and refactor your codebase accordingly.

  • Web Fonts: It is very easy to bring a new font into a HTML/JavaScript Windows 8.1 app using Web Fonts (fonts that are temporarily used, but not installed to the system).  For my Windows 8 tablet/desktop apps, I’ve been using Embedded OpenType fonts (.eot).  This format does not appear to be supported on mobile Internet Explorer 11 (which is what the phone’s HTML/JS app container is based upon).  However, the Web Open Font Format (.woff) does work. [UPDATED]

  • Advertisements: In my Windows 8.1 games that are in the Windows Store, I use Microsoft’s advertising platform to earn a little bit of revenue from an otherwise free-to-play game. The Ad SDK is available for use within the Windows project, but not the phone project. Note: This incompatibility is for HTML/JavaScript project types only. The C# project type, for example, does provide an Ad SDK for phone apps.

  • Audio: My games make use of audio, as you would expect, for things like click feedback, explosions, etc. This is relatively straight forward using the HTML5 Audio element/object. Since I don’t have 8.1 installed on actual hardware, I’ve only been able to test using the Windows Phone emulator in Visual Studio. In those tests, there are severe synchronization issues with HTML5 audio. Sometimes sound never plays, and sometimes there is a lag of a few seconds before a sound finally plays. It seems to be a memory management/caching thing, because once a sound has played for the first time, there’s usually little lag if that same file needs to play again within several seconds. [Confirmed on Device – Nokia Lumia 928, delays exist]

    [Update]
    The issue with audio lag may be how I was initializing the code. For example, to play a sound effect from JavaScript, I’ve been using code in my Windows apps like:
    var sfx_click = new Audio("/audio/menuclick.mp3");
    sfx_click.msAudioCategory = "GameEffects";
    sfx_click.volume = 0.8;
    sfx_click.play();
    

    I found a remark on MSDN that states:
    You must set the msAudioCatogery before setting the src property in code.

    So, I have rewritten the above to now look like:

    var sfx_click = new Audio();
    sfx_click.msAudioCategory = "GameEffects";
    sfx_click.src = "/audio/menuclick.mp3";
    sfx_click.volume = 0.8;
    sfx_click.play();


    Though I am still experimenting, this seems to have greatly improved the lag situation (so explosions happen at the appropriate time, etc).
  • NuGet: Integration with NuGet seems a bit weird, if not incomplete. You can add a package to the platform-specific projects individually, but not to the shared project. And, NuGet itself seems to get confused, because even though the package is added to the packages folder, none of the artifacts (scripts, css, etc) get created within the project itself. So, if there’s a library that I need to use in both places, what feels natural is to use NuGet to install the packages, and then use “Add Existing” to include files from the platform project’s packages folder into the shared project… but, this means that those artifacts are not truly maintained by NuGet.  If there’s then an update to the package, then I’ll need to manually repeat the process.

  • Windows.ApplicationModel.Store.CurrentApp.getAppReceiptAsync(): It seems, at least at the moment, that the XML returned from the Windows store differs from the XML returned from the Phone store. Specifically, the Phone document includes a default xmlns on the document element, while the Windows document does not (so, code that uses XPath queries will need to be handled conditionally depending on the platform).
  • Speech API: While converting Knave Craps to the phone, I came across an “Access Denied” error while initializing the Speech Synthesizer. I’m trying to come up with a workaround or find out the root cause.  The line of code that resulted in the exception:
    var synth = new Windows.Media.SpeechSynthesis.SpeechSynthesizer();
A View Inside My Head | All posts tagged 'ACS'

A View Inside My Head

Jason's Random Thoughts of Interest

NAVIGATION - SEARCH

Windows Azure platform AppFabric Access Control: Using the Token

In previous articles (Part 1, Part 2, Part 3), ACS was configured to process token requests from different Issuers, and a Customer application obtained a SWT token from ACS using an intermediate service (that represented its particular Issuer). 

Now that the application has a token, ACS is not needed again until that token expires.  This article will show how to use that token in order for the Customer application to call the Bartender web service.

Note: OAuth WRAP defines terminology for parts of the system as follows:

  • The Customer application is known as the Client
  • The Bouncer (ACS) is known as the Authorization Server.
  • The Bartender web service is known as the Protected Resource.

Passing a Token from Client to Protected Resource

We had to conform to OAuth WRAP specifications while acquiring a token from ACS, but there’s no actual requirement for how a Client must pass that token to the Protected Resource.  An Architect or Developer could come up with any contract that they would like to use.  However, a best practice would be to continue using the OAuth WRAP specification as guidance.

WRAP defines three different ways that a Protected Resource can accept a token:

  • In the HTTP header
  • In the Query String
  • In the Form contents

OAuth WRAP suggests that a Protected Resource at least support the HTTP header method, but makes no mandates.  If a Protected Resource is able to implement all three, then it would be in the position to support the widest variety of Clients.  However, if the Protected Resource is unable to use HTTP headers but could use a value passed in the Query String, then there would be nothing in the WRAP specification to prevent only that implementation.

Regardless of the method used, an unauthorized request (perhaps due to a bad or missing token) will result in a HTTP status of 401 Unauthorized, and a header in the response containing: WWW-Authenticate: WRAP

Tokens passed in the HTTP header are expected to use the “Authorization” header, with this header’s value containing the text: WRAP access_token="tokenstring".  Note that tokenstring is a placeholder for the actual SWT token obtained from ACS and does not need to be URL Encoded. 

Example (using a System.Net.WebClient class):

string headerValue = string.Format("WRAP access_token=\"{0}\"", HttpUtility.UrlDecode(token));
var client = new WebClient();
client.Headers.Add("Authorization", headerValue);


Tokens passed in either the Query String or in Form Contents are expected to use the name/value pair of: wrap_access_token=tokenstring.  Again, tokenstring is a placeholder for the actual SWT token obtained from ACS, and should be URL Encoded as needed in order to properly construct the HTTP Request (this may be done automatically by the framework that is used). 

Example (using a System.Net.WebClient class):

var values = new NameValueCollection();
values.Add("wrap_access_token", token);
var client = new WebClient();
client.UploadValues("BartenderWebservice", "POST", values));

Accepting and Validating a Token

SWT tokens are opaque to the Client.  That is, since the Client cannot modify the token, they shouldn’t really care what’s in it or how it’s structured.  The Protected Resource, however, must deconstruct, validate, and then use the claims that are contained within the tokens.  If anything is invalid or malformed, then the Protected Resource should deny access by returning a 401 Unauthorized status in the response.

The Windows Azure platform AppFabric SDK V1.0 contains plenty of boilerplate code in the samples demonstrating how to parse and validate a SWT token (so I won’t be repeating that code here).  In essence, all of the following needs to pass validation before the Client is authorized to access the Protected Resource:

  1. HMACSHA256 signature is valid
  2. Token has not yet expired
  3. The Issuer is trusted (i.e., contains the URL of the ACS server)
  4. The Audience is trusted (i.e., contains the URL of the Protected Resource)
  5. Additional required claims are present

For the nightclub example, the Customer’s Birthdate will be presented as a claim (#5 in the list above).  So, in addition to checking the technical aspects of the token, a business rule must also ensure that the Customer is of legal age to order a drink from the Bartender (in the United States, this means at least 21 years old).

Conclusion

I wrote this series of blog posts because I myself was having a hard time grasping the Hows and Whys of using Windows Azure platform AppFabric Access Control to secure a Protected Resource.  What I discovered was that by using claims based identity in conjunction with a federated identity model, you can incorporate a very scalable authorization scheme into your system without requiring complex code and/or special prerequisite software.  Technically, an organization could build this same functionality into a system without using Azure AppFabric.  However, Windows AppFabric Access Control offers the benefit of already being internet-facing and hosted in a high availability environment, and already includes a rich implementation of OAuth WRAP that supports many different kinds of Issuers.

Further Reading:

Windows Azure platform AppFabric Access Control: Obtaining Tokens

In this, the third part of a series of articles examining Windows Azure platform AppFabric Access Control (Part 1, Part2), I will continue developing the [somewhat contrived] nightclub web service scenario and demonstrate how to obtain a token from ACS that can be used to call into a Bartender web service.

A Quick Review

Our distributed nightclub system has four major components: A Customer application coupled with some external identity management system, a Bartender web service, and ACS, which acts as our nightclub’s Bouncer.

A Customer application ultimately represents a user that wishes to order a drink from the Bartender web service.  The Bartender web service must not serve drinks to underage patrons, so it needs to know the user’s age (this is known as a “claim”).  The nightclub has no interest in maintaining a comprehensive list of customers and their ages, so instead, a Bouncer ensures that the user’s claimed age comes from a trusted source (this is known as an “issuer”).  If the claim’s source can be verified, the Bouncer will give the customer a token containing its own set of claims that the Bartender web service will recognize.  In the end, the Bartender doesn’t have to concern itself with all of the possible issuers – it only needs to recognize a single token generated by the Bouncer (ACS).

separateservice_issuer


Anatomy of a Token Request

ACS uses a subset of the OAuth Web Resource Authorization Protocol (WRAP) to request tokens.  The tokens themselves use the Simple Web Token (SWT) format.  The latest specification documents for both WRAP and SWT can be found in the Files section of the “OAuth WRAP WG” Google Group: http://groups.google.com/group/oauth-wrap-wg/files

The power of ACS derives from the simplicity of WRAP/SWT.  All of the token requests are performed as regular HTTP POSTs, and the response is a URL Encoded string of name/value pairs (one of those being the token itself).  Even if your Issuer (Identity Management System) does not natively know how to request a token from ACS, which is very likely, then it is easy to either build this into the application itself, or write a small service to perform this work. 

At the HTTP protocol level, a token request may resemble:

REQUEST:

POST https://jasondemo.accesscontrol.windows.net/WRAPv0.9/ HTTP/1.1
Content-Type: application/x-www-form-urlencoded
Host: jasondemo.accesscontrol.windows.net
Content-Length: 155
Expect: 100-continue

wrap_name=Ohio&wrap_password=LVMjImkJjIBDrJHbTzyrioeajIFpV27tW2uTuCCOYFY%3d
&wrap_scope=http%3a%2f%2fmyserver.domain%2fBartender&DOB=1979-05-25T00%3a00%3a00


RESPONSE:

HTTP/1.1 200 OK
Content-Length: 315
Content-Type: application/x-www-form-urlencoded
Server: Microsoft-HTTPAPI/2.0
x-ms-request-id: ca165b72-5d9f-4196-9272-1b80c8c3e02a
Date: Mon, 22 Mar 2010 13:26:44 GMT

wrap_access_token=Birthdate%3d1979-05-25T00%253a00%253a00%26Issuer%3dhttps%253a%252f%252f
jasondemo.accesscontrol.windows.net%252f%26Audience%3dhttp%253a%252f%252fmyserver.domain%
252fBartender%26ExpiresOn%3d1269307605%26HMACSHA256%3deSgT1Gwx3H6owK8hBR82ixG0DRTgM2osI3v
7NdJLQwY%253d&wrap_access_token_expires_in=43200


The response displayed here contains two name/value pairs: wrap_access_token and wrap_access_token_expires_in.  If the token request was invalid, then a HTTP 401 status would have been returned instead of a 200.

Notice that “wrap_access_token_expires_in” contains the value 43200, which is the number of seconds that we defined in the Token Lifetime field of the “BouncerPolicy” token policy (in Part 2).  This value is provided as a convenience to indicate how long the token will be valid.  Taking a cue from systems that use lease lifetimes, like DHCP, it might be a good practice to acquire another token at 50% of the Token Lifetime (21600 seconds in this case, or 6 hours). 

As the name suggests, “wrap_access_token” contains the SWT token itself.  This is a URL Encoded set of name/value pairs that also includes a HMACSHA256 signature to prevent the token from being tampered with.  This token does not need to be parsed by the client application; it can be treated as a magic string.  However, there is nothing special about its contents:

Birthdate=1979-05-25T00%3a00%3a00 &Issuer=https%3a%2f%2fjasondemo.accesscontrol.windows.net%2f &Audience=http%3a%2f%2fmyserver.domain%2fBartender &ExpiresOn=1269309326 &HMACSHA256=NLmcGYITc8aWvhNp6Ge54TGJxhJCVX4Q67DDLBKoIy4%3d


“Birthdate” is the result of the Passthrough Claim Mapping (Part 2) that took the inbound claim called “DOB” and mapped it to this outbound claim called “Birthdate”.  ACS has no idea that this is a date – it just knows that it’s a string of characters that will be understood by the destination.  The other claims that are present in this SWT token (Issuer, Audience, ExpiresOn, and HMACSHA256) are all system claim types that are reserved for use by SWT. 

Note the value of “Issuer” in this token.  In our Request, the stated Issuer was “Ohio”, which was a trusted Issuer that we defined when configuring the Service Namespace using AcmBrowser.  The Issuer of this SWT token is now the Service Namespace.  Our Bartender web service has no direct trust with the Ohio Issuer, but it will trust tokens signed by the Service Namespace (which trusts the Ohio Issuer).  Just as ACS can trust multiple Issuers, it’s also possible that the Bartender web service could trust multiple ACS Issuers (maintaining a symmetric key for each one to verify the HMACSHA256 signature).  There is a lot of flexibility in how ACS can be incorporated into your own system’s architecture.

Implementation

Because the “Ohio” issuer was created in ACS using a Symmetric 256-bit key, we have two choices for how to use this key in order to request a token from ACS.  We could send the key itself in plaintext, sort of like a password (in fact, this uses a WRAP profile that is intended for username/password authentication).  Alternatively, we could create a SWT of our own, using the key to sign it, and then send that token to ACS as part of the token request.

A simple WRAP request that provides the Issuer’s name and password (symmetric key) in plaintext would contain the following name/value pairs:

  • wrap_name (Issuer Name, as defined in the Issuer definition in ACS)
  • wrap_password (Current Key, as defined in the Issuer definition in ACS)
  • wrap_scope (Applies To, as defined in the Scope definition)
  • additional claims (will be processed by the defined Scope Rules for claim mapping)

private static string RequestTokenFromACS_usingPassword(DateTime dob) { var values = new NameValueCollection(); values.Add("wrap_name", "Ohio"); values.Add("wrap_password", "LVMjImkJjIBDrJHbTzyrioeajIFpV27tW2uTuCCOYFY="); values.Add("wrap_scope", "http://myserver.domain/Bartender"); values.Add("DOB", dob.ToString("s")); var client = new WebClient { BaseAddress = "https://jasondemo.accesscontrol.windows.net" }; return Encoding.UTF8.GetString(client.UploadValues("WRAPv0.9", "POST", values)); }


Using a SWT within a WRAP request is just as simple, but the difficulty is in creating the SWT itself.  The WRAP request would contain the following name/value pairs:

  • wrap_assertion_format (SWT in this case)
  • wrap_assertion (the SWT token that we generate and sign using the Current Key)
  • wrap_scope (Applies To, as defined in the Scope definition)

The SWT token itself would contain the following name/value pairs:

  • Issuer (Issuer Name, as defined in the Issuer definition in ACS)
  • Audience (STS Endpoint, as listed on the Service Namespace overview page)
  • ExpiresOn (integer containing the number of seconds after the Epoch date of January 1, 1970 00:00 UTC that the token will expire)
  • additional claims (will be processed by the defined Scope Rules for claim mapping)
  • HMACSHA256 (URL Encoded Base64 signature of the unsigned token)

private static string RequestTokenFromACS_usingSWT(DateTime dob) { string requestToken = GetRequestToken(dob); var values = new NameValueCollection(); values.Add("wrap_assertion_format", "SWT"); values.Add("wrap_assertion", requestToken); values.Add("wrap_scope", "http://myserver.domain/Bartender"); var client = new WebClient { BaseAddress = "https://jasondemo.accesscontrol.windows.net" }; return Encoding.UTF8.GetString(client.UploadValues("WRAPv0.9", "POST", values)); } private static string GetRequestToken(DateTime dob) { StringBuilder sb = new StringBuilder(); sb.AppendFormat("DOB={0}&", dob.ToString("s")); sb.Append("Issuer=Ohio&"); sb.Append("Audience=https://jasondemo.accesscontrol.windows.net/WRAPv0.9&"); sb.AppendFormat("ExpiresOn={0:0}", (DateTime.UtcNow.AddMinutes(10) - new DateTime(1970, 1, 1)).TotalSeconds); return AddSignature(sb.ToString()); } private static string AddSignature(string unsignedToken) { HMACSHA256 hmac = new HMACSHA256(Convert.FromBase64String("LVMjImkJjIBDrJHbTzyrioeajIFpV27tW2uTuCCOYFY=")); var sig = hmac.ComputeHash(Encoding.ASCII.GetBytes(unsignedToken)); string signedToken = String.Format("{0}&HMACSHA256={1}",  unsignedToken,  HttpUtility.UrlEncode(Convert.ToBase64String(sig))); return signedToken; }

Where to Execute this Code

The code to request a token can easily be implemented within an application that uses that token to call into a protected resource.  In the nightclub example, this code could be incorporated right into the Customer application.  However, this would mean that the claim (Birthdate) would originate from the application itself.  It also means that the application would need to have access to the Issuer key, making it possible for a nefarious user to obtain the key and bypass the application to directly access the protected resource.  These may not be concerns for your specific system, though.

A better solution for the nightclub example, which tries to mimic the real-life State ID system, would be to create a service for each Issuer that their Customer applications call into.  This service would then be able to obtain claim information from a source of authority (such as a LDAP directory), obtain a token from ACS, and then return that token to the Customer application.  The Customer application would never communicate with ACS directly, so there would be no reason for the application to have the Issuer key (making it harder for that nefarious user to discover the key).

From Here

This article demonstrated how to obtain a token from ACS.  In the next article, I will show how to use this token in order to access a protected resource (such as our Bartender web service) and how to validate a token when a protected resource receives one. 

(Continued in Part 4)

Further Reading:

Windows Azure platform AppFabric Access Control: Service Namespace

In the previous article, I provided an example scenario of how claims-based access control might map to the real-world event of a customer entering a bar. This article will build upon that concept, eventually enabling a Customer application to obtain a token from our Bouncer (ACS), and then use that token to order a drink from the Bartender web service.

Now let’s walk through how to create a Service Namespace in Windows Azure, which is needed to permit your application and/or web service to utilize AppFabric Access Control.

Service Namespace

At this time, Windows Azure platform AppFabric provides two services for developers to use: Service Bus and Access Control. Within a Project (i.e., the unit of billing for an Azure account), a “Service Namespace” is used to organize a set of these AppFabric service endpoints. Services within a Service Namespace share the same DNS naming convention, geography (datacenter where the services are hosted) and owner key (security for managing the services).

To create a new Service Namespace, start by logging into the Windows Azure portal (http://windows.azure.com). Navigate to the AppFabric section, choose the Project in which the Service Namespace will be created, and then click the “Add Service Namespace” link. The next screen will prompt for a Name, a Region, and the size of the ServiceBus Connection Packs for the new Service Namespace:

create_service_namespace

  • The name must be unique among all Service Namespaces in existence because this name will be incorporated into DNS aliases. The Windows Azure portal provides a “Validate Name” function to ensure that the name entered meets the required syntax criteria and that it has not already been used.
  • Region maps to the Microsoft data center where the services will run. Ideally, this should be as close to the users as possible.
  • “ServiceBus Connection Packs” is to support the Windows Azure platform AppFabric Service Bus. Since this article is only examining Access Control, the number of ServiceBus connections can be set to zero.

Once you click the “Create” button, Windows Azure will generate the services and DNS entries for your new Service Namespace. However, looking at the information page on the portal for the Service Namespace reveals nothing that is noticeably useful for configuring these services:

service_namespace_info

Configuring Access Control

On the portal, the only actions that you can perform are “Generate a New [Management] Key” and “Delete the Service Namespace”. How then do we configure Access Control?

Access Control, like most things in Windows Azure, is configured via a set of web services. While robust tooling is something that is currently being developed (or something that you could develop on your own), there are a few demo tools included as source code in the Windows Azure platform AppFabric SDK V1.0, including a Windows (GUI) application called Access Control Service Management Browser (AcmBrowser).

By default, after installing the SDK, you can find the Visual Studio solution for the AcmBrowser application in:

C:\Program Files\Windows Azure platform AppFabric SDK\V1.0\Samples\AccessControl\ExploringFeatures\Management\AcmBrowser

To use this application, you will need the Service Namespace’s name (the one that you entered during the creation process) and Management Key for that namespace (this is “Current Management Key” string on the screenshot above). After providing these values to AcmBrowser, you can then click the “Load from the Cloud” button to see what is already configured. As you would expect, new namespaces will have nothing pre-configured, as indicated by the “Resources” tree on the left showing Issuers, Scopes, and Token Policies, but these nodes contain no children.

mgt_browser_1

Token Policy

The first thing that we need to create is a Token Policy. This item defines a length of time, in seconds, that a token will be valid until it expires, as well as a symmetric key that is used to sign tokens. This symmetric key will be shared with our Bartender web service, but not the Customer application (else the customer would be able to generate tokens themselves, bypassing ACS and being capable of spoofing any claim).

To create a Token Policy using AcmBrowser, right click on the “Token Policy” node and choose “Create…”:

create_new_tokenpolicy

In this example, tokens created using the “BouncerPolicy” will expire 12 hours (60 * 60 * 12 = 43200 seconds) after they have been generated, and the Signing Key was created by clicking the “Generate” button. Should this key ever be compromised, a new key can be generated in the same way.

Scope

ACS is not an identity provider. You don’t maintain users in ACS, but rather, maintain a list of trusted identity providers (Issuers) that can supply claims on behalf of their users. With this federated model, the claims presented may be named different things, but convey the same information. For example, a claim containing a Birthdate may be named “DOB” by one Issuer and “Date of Birth” by another Issuer, but both sources supply the same type of information.

The web service that will eventually consume these claims, however, shouldn’t be concerned with knowing all of the variations. Instead, ACS provides Claim Mapping capabilities that can rename claims, or express a new claim based on the presence of a known claim in the token request. Before we can configure the claim mappings, though, we need to define a Scope and Issuers.

During the token request, one piece of information that is required is the URL where the token will eventually be used (known as the “Applies To”). ACS uses this in order to know what set of rules to apply when generating that token.

A Scope is the mechanism that ties a URL to a Token Policy, and is created within AcmBrowser by right clicking on the “Scopes” node and choosing “Create…”. In this example, our Scope is defined with the Applies To URL of the Bartender web service and associated to the BouncerPolicy Token Policy. Note that this “Applies To” URL is actually a substring of the real web service URL; any URL that is provided during the token request that starts with this same “Applies To” string will match to this scope, and it’s possible that an actual URL will match multiple Scopes (allowing for chaining of rules from the longest substring match to the shortest).

create_new_scope

Issuers

In a Claims-Based Identity and Access Control system, the destination application or web service does not concern itself with end-user authentication. Instead, the user authenticates itself with its own identity management system (known as an Issuer), and this system then becomes a trusted source of claims about that user. This Issuer might be a standalone application, a custom web service running on an intranet server, another AppFabric Service Namespace, or even an Active Directory Federation Services 2.0 system. As a result, there are different ways to prove that information presented during a token request came from a trusted Issuer.

In the nightclub example, the customer presents a driver’s license that was issued by their state of residence. Keeping with this concept, let’s define a few Issuers in ACS named after states (Ohio, Michigan, Indiana, etc) by first right clicking on the “Issuers” node in AcmBrowser and selecting “Create…”:

create_new_issuer

ACS is able to recognize and validate a token request originating from an Issuer in many different ways. In this example, the “Ohio” Issuer is defined using a Symmetric 256-bit Key (other choices that could have been used include X509 and FedMetadata). After sharing this secret with the Issuer, the “Issuer Name” and “Current Key” can be provided as claims during a token request, much like a username and password, or the key can be used by the Issuer to sign a token request. But, more on that in another article.

[Scope] Rules

During the token request, an arbitrary number of claims will be presented to ACS. The application that will finally consume the token generated by ACS may only require a subset of those claims, if any. To decide what claims should be included in the output token, we need to create a set of Rules (one per output claim).

To create rules for a Scope, you first expand the Scope’s node in AcmBrowser, right-click on the “Rules” node, and then choose “Create…”:

Scope_Rules_Node

A Rule can be defined as either PassThrough or Simple. A PassThrough rule is used to rename a claim from whatever the Issuer called it to whatever the final application will expect it to be called (the value will be preserved). A Simple rule, on the other hand, will generate a claim (name and value) in the output if a specific claim (name and value) was present in the input. Note that the input and output claim values in a Simple rule must be explicitly defined – you cannot use pattern matching, etc.

For the example scenario, we’ll assume that the Ohio Issuer uses “DOB” as the name of the “Birthdate” claim that the Bartender web service will be expecting. A PassThrough rule is used to rename that claim so that the resulting token will include a claim called “Birthdate” instead (the provided value will be preserved).

create_new_rule

Wrapping Up

At this point, everything has been defined in memory on your machine, and nothing has actually been saved to the cloud. To commit your changes, you will need to click on the “Save to Cloud” button in AcmBrowser. Note that AcmBrowser is not sophisticated enough to merge with an existing set of configuration, so if your Service Namespace is not already empty, then you will need to click the “Clear Service Namespace in Cloud” button prior to saving to the cloud. You can also load and save local copies of the configuration using the tool, which is useful for backup purposes as well as working on a particular configuration over the course of multiple days without disturbing what is already running in the cloud.

In the next part of this series, I’ll show code for how everything finally comes together for this contrived example.

(Continued in Part 3)

Further Reading:

Windows Azure platform AppFabric Access Control: Introduction

The Windows Azure platform AppFabricAccess Control service was one aspect of the Windows Azure platform that I found a bit challenging to understand, primarily because identity is not a domain that I regularly work with. This post, the first in a planned series of articles, will explore what the Access Control service is and why it is useful.

Three Geeks Walk Into a Bar…

nightclub_access_control Let’s examine a common real-world scenario: Ordering a drink from a bartender at a nightclub.

Before the nightclub opens, the bouncers inform the bartenders about the token that customers will bear on that night to indicate that they are of legal age. This could be a stamp on the back of the hand, a colored wristband, etc.

At the door, a customer will present their identification to the bouncer that shows, among other things, their date of birth. This ID could be a state-issued driver's license, a passport, or even a school identification card. The point is that the nightclub didn’t issue that ID, but they recognize the authority that did issue it, and will accept the claim (the birth date) that is displayed on that ID.

If the bouncer determines that the ID is authentic and hasn’t been tampered with, then he will give the customer the token of the night (stamped hand or colored wristband), and the customer is free to enter the bar.

Once inside, the customer only needs to show the token to the bartender in order to buy drinks. They do not need to show their ID.

The next night, the token will change, so a customer cannot use a token obtained the night before.

Federated Access Control

Azure_access_control Now let’s look at a similar scenario: Calling a web service from an application. Only, in this case, the web service should not fulfill requests from unauthorized clients. Furthermore, it’s not the web service’s responsibility to authenticate the client; it is simply expecting the client to bear some verifiable proof that it is already authorized to use the service.

Before calling the Web Service, the Service Consumer (application) must first obtain a token that is issued by an Access Control Service (ACS). This is done by sending a number of claims to the ACS, with one of these claims being secrets belonging to an Issuer that the application is associated with.

If the Issuer is recognized and trusted by the ACS, then a token will be created. This token (which is a collection of name/value pairs) will contain claims, an expiration date, and a signature that can be used to ensure that the token was not modified after it was created.

Once the Service Consumer has a valid token, it can then call the Web Service and provide that token in a location where the service expects to find it, such as in a HTTP header. The Web Service validates that the token is well-formed, has not expired, and has not been modified since it was created. If anything fails validation, then the processing aborts. Otherwise, the web service returns data to the Service Consumer, possibly using claims contained in the token as input in the process.

This scenario is considered to be Federated because the ACS doesn’t actually maintain a list of usernames and passwords. Instead, it maintains a list of trusted Issuers with the expectation is that the Issuer is responsible for authenticating its own users.

Correlation

In these examples, the Web Service is analogous to the nightclub’s Bartender: it has something to provide to the Service Consumer (Customer), but the Service Consumer must present an appropriate token that is generated by the Access Control Service (Bouncer).

The web service example above is intentionally vague in the part where a token is obtained. There are a few different ways that an Issuer can be identified in a token request, and while passing the Issuer’s secret in plain text is one of those ways, it certainly shouldn’t be taken lightly. Whoever has the Issuer’s key can spoof any of the claims, and that might prove to be a challenge for the service. In the example where we need a Date of Birth claim to be presented, it would probably be a bad idea to allow the customer themselves to say “I’m from Ohio, here’s a blank driver's license that meets all of the standards of a proper ID, and, oh yeah… I’m writing on here that I am 21 years old.”

Instead, claims should originate from the Issuer in some way that cannot be tampered with by the application (using the assumption that the application itself should not be trusted). With the plain text method, this might require having a separate service that runs within the Issuer’s domain and is aware of its users and also ACS. This service would broker the ACS token request for the application, automatically providing any claim data that might be needed (like the Date of Birth) from the Issuer’s own user database. The application would be provided with the same token, but would never have the Issuer’s secret that is required to obtain the token directly from ACS.

(Continued in Part 2)

Further Reading: